I am not doing anything for now with the hardware or equipment (engines and cars), so I am working with the software in JMRI.
After an initial look at Layout Editor, I decided to go with Control Panel Editor, as it is the one I am most familiar, having used it for the past 6-7 years (0 years for the other two, so they had no chance).
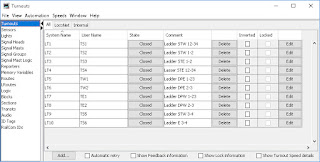
As such, I created turnouts, sensors and signal masts first, then the panel with simple icons. This is what I got:
Turnouts
Sensors

Signal Masts

Panel
You will notice a small modification to the plan. I found that I have a little more space than originally designed, and so I decided to add another staging track, calling it Staging 4. Also, in order to display the turnouts for track 4 correctly as on the layout, I needed to rotate the turnouts. With these icons, it does not make the panel pretty, but for now I will live with it.
Once I had all the above done, I added some Logix, 4 to be exact, to drop the signals to red when a train moves past it in the next block.


After an initial look at Layout Editor, I decided to go with Control Panel Editor, as it is the one I am most familiar, having used it for the past 6-7 years (0 years for the other two, so they had no chance).
As such, I created turnouts, sensors and signal masts first, then the panel with simple icons. This is what I got:
Turnouts

Sensors

Signal Masts


Once I had all the above done, I added some Logix, 4 to be exact, to drop the signals to red when a train moves past it in the next block.

The next screen is one of the conditionals to show what it has inside

In here, regardless of which signal needs to be dropped, I drop all 3 of them; in this example they are the East signals at the station.
Next I created the Occupancy Blocks and Portals. These will be used to run Warrants, which run the trains.

Each OBlock corresponds to a sensor. There is an associated length to each block. I chose inches, but I can easily change the measurement in centimeters by clicking the "in" cell, and the table will convert the number from inches to centimeters.
Next I created the portals. These are the connection between 2 OBlocks.

Portals are non directional, so placing a block on the left or the right, it does not matter. It just defines the connection between the 2 blocks.
Once the portals are created, I then went back to the OBlock table and started defining the paths (which again do not define directionality even though the column labels say From and To) and possible turnout settings for the paths.

The above example shows the path for block OSTECS (OBlock Staging East CS). This block has 3 turnouts for 4 possible paths. The paths are used either to got from the Curve into one of the staging tracks, or from one of the staging tracks out to the Curve. The Turnouts show how they are set for the path between the CS block and Staging track 4.
This represents about 6-7 hours of work, which includes also testing, stumbles, redesign, deletion of work, rewriting new work, wrong thought direction needing then backtracking, ideas (good and bad).
The last thing I need to do is how to implement the signals. At the moment they are set manually by clicking on them, and the warrants will obey them, but I need them to be more automatic. I have not yet found a way to make them work the way I would like them to work, for both trains that stop at the station and trains that go through. I also would like them not to activate when facing an oncoming train (of course they need to be RED at that point). In fact I would like them to be red all the time, other than letting a train go through. having said that, the signals will be for visual effects only and will not act on trains at all. Speeds will be regulated by the warrant speeds. The signals I will use are dual coil snap type, just like the turnouts, so at the moment I am considering activating them with the DS54s, just like a turnout. I need to do more testing.
At this point my next step is to start working with the hardware. I will put together a starting set with the power supply, command station, and 2 pieces of track, main line and programming track. I need to reset all the boards to defaults and will do that with a laptop with a Loco-Buffer. Hopefully by next week I will have something up to show you, but no promises. Cheers

Comments
Post a Comment